It was a Tuesday afternoon, and my two boys were doing what they do best: turning the living room into a mess.
As I sat on the floor with them, I looked over at the sliding glass door and saw it—a thick, black, almost fuzzy layer of grime packed into the tracks.
It wasn’t just dust.
It was a cocktail of outdoor pollution, dead insects, and moisture that had turned into a literal “mud” in the very place my kids were playing.
As a dietician, my brain immediately went to cross-contamination.
We spend so much time making sure our kitchen counters are sanitized and our produce is organic, but we often ignore the “lungs” of our home—the window tracks.
Every time we open that window for a “fresh” breeze, we are actually inviting air to pass over a trap of allergens and potential mold spores.
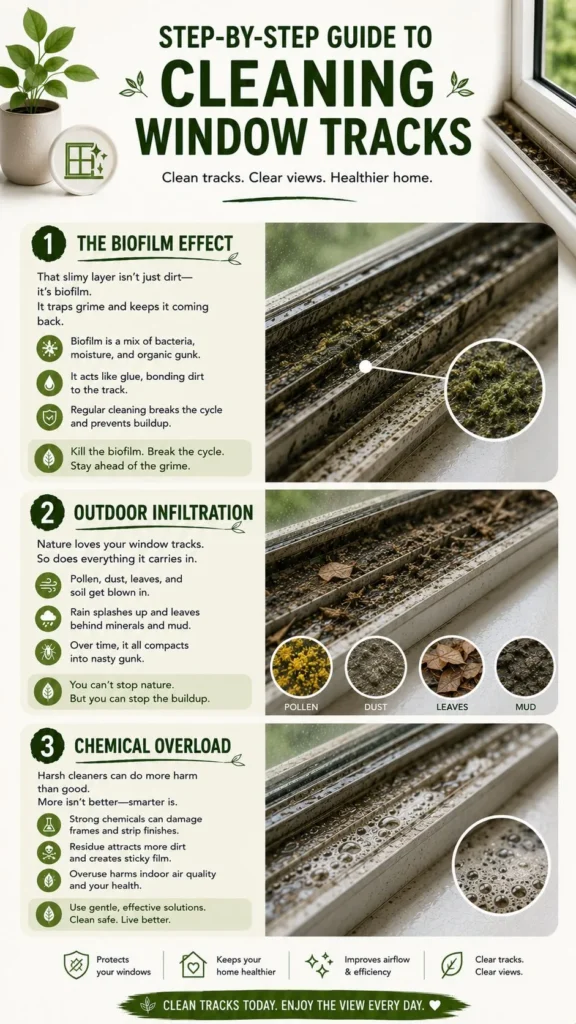
Step-by-Step Guide To Cleaning Window Tracks
Before heading over to the step-by-step guide, you need to know the following things.
Why This Window Grime is a Health Hazard
In my professional world, I focus on what goes into our bodies to keep our immune systems strong. But as a mom, I’ve learned that the environment around us is just as important.
Window tracks are the ultimate “neglected zone” for three reasons:
- The Biofilm Effect: When dust meets window condensation, it creates a moist “biofilm” where mold (specifically Alternaria and Aspergillus) loves to grow.
For children with sensitive respiratory systems, this is a major trigger. - Outdoor Infiltration: These tracks catch everything from vehicle exhaust particles to heavy pollen.
If it’s stuck in your track, it’s only one gust of wind away from being on your carpet where your kids play. - Chemical Overload: Most “miracle” cleaners for window tracks are loaded with harsh VOCs (Volatile Organic Compounds).
As a health professional, I don’t want my kids breathing in those heavy fumes in a confined space.
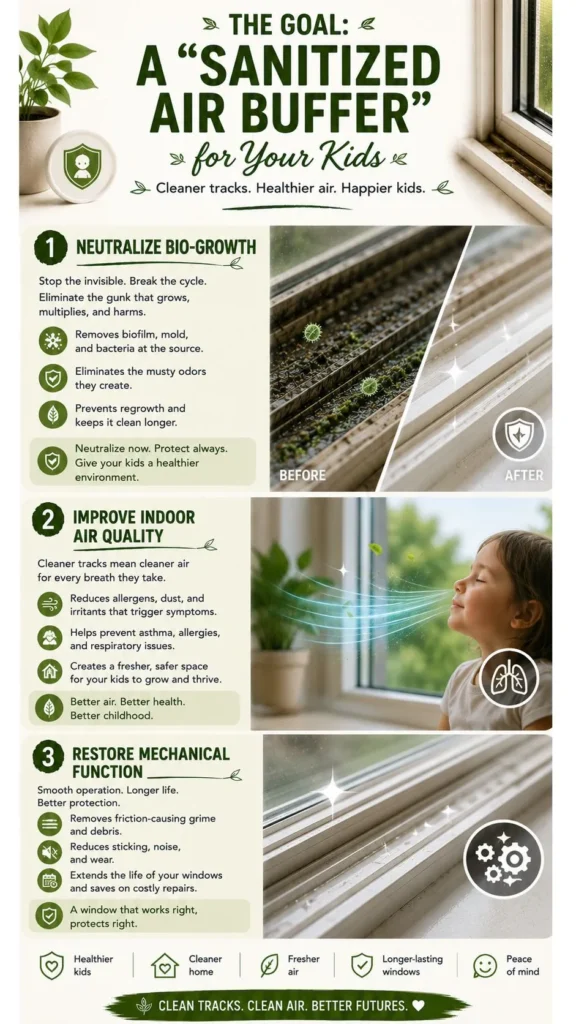
The Goal: A “Sanitized Air Buffer” for Your Kids
As a dietician, I view my home’s entry points, like windows and doors, the same way I view food storage.
If there is a “contaminant” at the source, it eventually spreads.
Our goal with this 5-minute deep clean isn’t just “shiny tracks.” It is to:
- Neutralize Bio-Growth: Kill any hidden mold or bacteria spores using natural acidity (vinegar) rather than toxic bleach.
- Improve Indoor Air Quality: Ensure that when you crack the window for a breeze, you aren’t blowing a year’s worth of dried pollen and dust into your living room.
- Restore Mechanical Function: Remove the grit that grinds down your window’s seal, which saves you money on energy bills and future repairs.
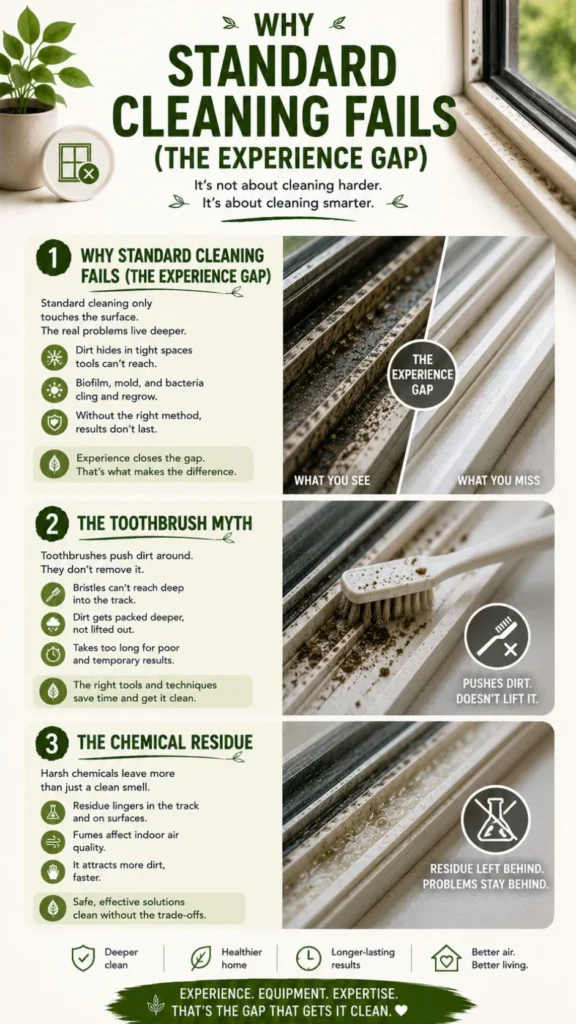
Why Standard Cleaning Fails (The Experience Gap)
We’ve all done it. We grab a roll of paper towels and a blue glass cleaner spray, give the tracks a quick squirt, and wipe.
But within 30 seconds, you realize you haven’t cleaned anything—you’ve just created grey mud.
Here is why the “Standard Mom Method” usually fails:
- The “Mud-Pushing” Cycle: Standard glass cleaners are too “thin” to break down the heavy outdoor minerals found in tracks.
You end up pushing a wet slurry of dirt into the corners, where it becomes even harder to remove. - The Toothbrush Myth: I used to keep an old toothbrush in my cleaning caddy specifically for this.
But the bristles are too soft and too short.
They skip over the “gunk” and can’t reach the bottom of the deep vinyl grooves found in most modern US windows. - The Chemical Residue: Many industrial cleaners leave a “sticky” residue.
In a window track, this acts like a magnet for new dust. Within a week, your tracks look just as bad as when you started.
To get a true “dietician-approved” clean, we have to stop wiping and start extracting.
That’s why I developed a “Fizz and Scrub” method. It uses simple pantry staples—vinegar and baking soda—to do the heavy lifting safely.
But the real secret?
It’s not just the solution; it’s the tool.
The “Mom-Approved” Tool Kit
I used to try the “old toothbrush” trick, but as any mom knows, a toothbrush is meant for teeth, not deep vinyl grooves. It just pushes the mud further into the corners.
I finally switched to a tool designed for the job: The Safa Enterprise 5-in-1 Cleaning Brush.
The Safa Enterprise 5-in-1 Cleaning Brush is a staple in my cleaning caddy now. What I love as a busy mom is the built-in scraper.
When you have dried-on mud or “mystery gunk” that’s been there since last summer, the scraper pops it right out so the bristles can actually do their job.
It makes a 20-minute struggle into a 5-minute win.
The 5-Minute “Fizz & Scrub” Strategy
Before we start, a quick Mom-to-Mom safety tip: If your kids are nearby, make sure they are a safe distance away from the window.
While we are using natural ingredients, we want to avoid any accidental slips or curious hands touching the “fizz.”
What You’ll Need:
- Baking Soda (The gentle abrasive)
- Distilled White Vinegar in a spray bottle (The non-toxic sanitizer)
- Safa Enterprise 5-in-1 Cleaning Brush (Or a similar dedicated track brush)
- Vacuum with a crevice attachment
- Microfiber cloth
Step 1: The “Dry” Extraction
Never start with liquids! If you spray a dirty track immediately, you just create a muddy paste that’s impossible to remove.
- Use your vacuum’s crevice tool to suck up all the loose dust, dead bugs, and pet hair.
- Mom Tip: Use the scraper end of your Safa Enterprise brush to gently flick out the large debris from the very corners while you vacuum.
Step 2: The Baking Soda “Snow”
Lightly sprinkle baking soda along the entire track. Focus extra attention on the corners where the “black gunk” is usually thickest. Since baking soda is non-toxic and a natural deodorizer, I feel much safer using this in my kids’ playroom than heavy bleach sprays.
Step 3: The Vinegar “Fizz”
Slowly spray your white vinegar over the baking soda. You’ll see it start to bubble—this is the chemical reaction breaking down the grease and mineral deposits.
- Let it sit for 2-3 minutes. This gives the vinegar time to sanitize the area and loosen that “biofilm” we talked about.
Step 4: The Targeted Scrub
This is where your Safa Enterprise brush shines.
- Use the tapered bristles to scrub deep into the grooves. Because the brush is shaped specifically for these tracks, you aren’t fighting the tool—it does the work for you.
- For stubborn, hardened spots, use the integral tail scraper to lift the grime without scratching your vinyl or aluminum frames.
Step 5: The Final Wipe-Down
Wipe away the slurry with a microfiber cloth or paper towels. If there’s any residue left, a quick spray of plain water and a final wipe will leave the tracks looking brand new.
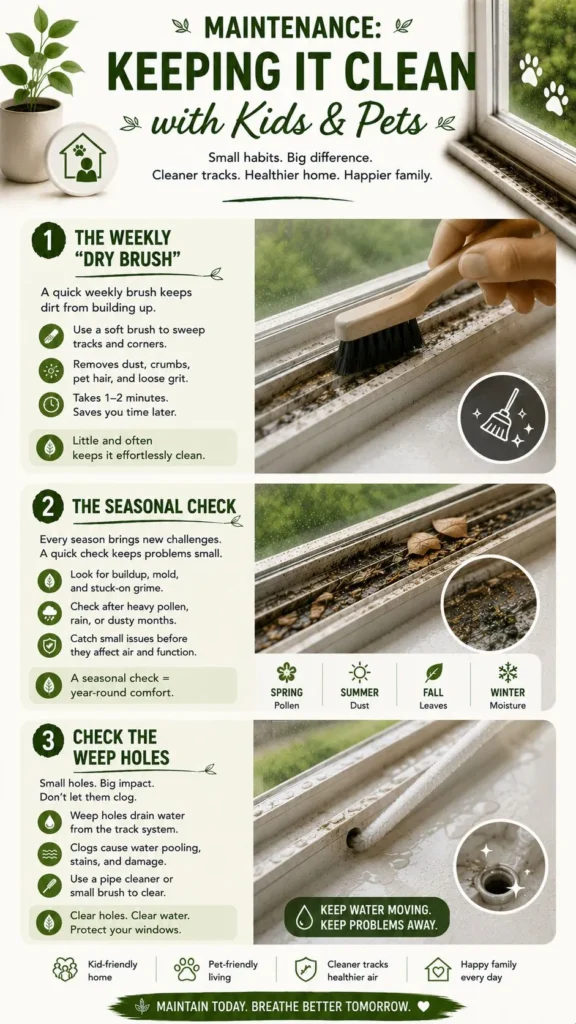
Maintenance: Keeping it Clean with Kids & Pets
Cleaning your tracks once is a victory, but keeping them that way is the real “Mom Hack.”
In a house with two kids and the constant transition from indoor to outdoor play, dirt is inevitable—but “the gunk” doesn’t have to be.
The Weekly “Dry Brush”
You don’t need the vinegar and baking soda every week. During your regular dusting routine, take your Safa Enterprise brush and quickly whisk out any dry loose dirt. It takes 30 seconds and prevents moisture from turning that dust into mud.
The Seasonal Check
I make it a habit to do a full “Fizz & Scrub” during the change of seasons. In the US, spring pollen and autumn leaves are the biggest offenders.
Check the Weep Holes
Those tiny little holes on the outside of your window frame are designed to let water out.
If they get clogged with debris, water sits in your tracks and starts the mold process. Use the tapered end of your brush to keep these clear.
Conclusion
As a dietician, I’m always telling my clients that small, consistent choices lead to the biggest health transformations.
The same is true for your home. We often focus so much on the “big” cleaning projects that we forget the small gaps that actually impact our indoor air quality.
Cleaning your window tracks isn’t just about making your house look better. It’s about creating a sanitized buffer between the outside world and your family.
By using non-toxic methods and the right specialized tools, you can finish this “dreaded” chore in the time it takes to brew a pot of coffee.
Remember, you don’t need a cabinet full of harsh chemicals to have a truly clean home.
You just need a little bit of science, a dash of vinegar, and the right brush in your hand.
Happy cleaning, Mama!